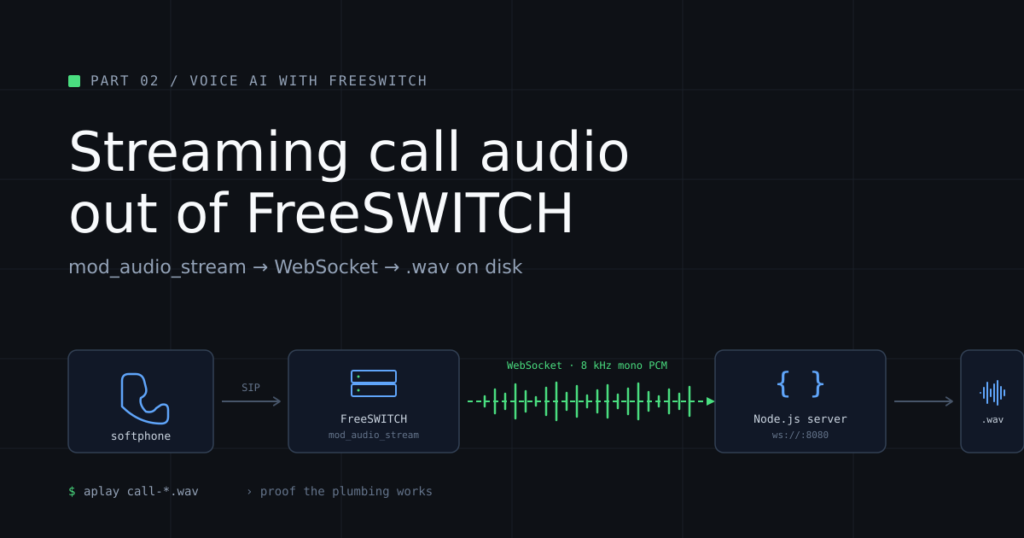
Part 2 of a series. In Part 1 we mapped the architecture: caller → SIP → FreeSWITCH → audio bridge → STT → LLM → TTS → back into the call. Here we build the first real piece — getting live call audio out of FreeSWITCH and into a process you control. No AI yet. The goal is to prove the plumbing works.
If you haven’t installed and hardened FreeSWITCH yet, start there: [Installing FreeSWITCH] and [Hardening FreeSWITCH: A Production Baseline for Day One]. This post assumes you have a hardened FreeSWITCH binary install on Debian 12, with extension 1001 (or any other internal extension) registered to a softphone you can dial from.
By the end of this post, you will have:
- A FreeSWITCH module called mod_audio_stream installed and loaded
- A WebSocket server running in Node.js that receives streamed call audio
- A dialplan extension that wires the two together
- A .wav file on disk containing audio you spoke into your softphone
That last item is the proof. When you can play it back and hear yourself, the plumbing works.
All files referenced in this post are also available in the GitHub repo for the series: https://github.com/thevoiceguy/freeswitch-voice-ai-series — clone the repo if you’d rather copy files than paste from the browser.
A note on the module landscape
If you’ve read other tutorials about FreeSWITCH and WebSockets, you’ve almost certainly seen references to mod_audio_fork from the drachtio/drachtio-freeswitch-modules repo.
That repo is gone.
It 404s. The forks that remain are unmaintained, and the module itself depended on a custom-compiled FreeSWITCH with libwebsockets support — which the binary install does not have. Every tutorial pointing at mod_audio_fork is broken.
The successor is mod_audio_stream, maintained by amigniter and explicitly designed to work against stock binary FreeSWITCH. It ships as a prebuilt Debian 12 package. The community edition is free for up to 10 concurrent streaming channels — plenty for a tutorial and most small production deployments.
That is what we use here.
What we’re building
Softphone (1001)
│ SIP INVITE
▼
FreeSWITCH (your hardened box)
│ dialplan matches “9999”
│ Lua script invokes uuid_audio_stream
▼
mod_audio_stream
│ 8 kHz mono linear PCM
│ over WebSocket
▼
Node.js WebSocket server (localhost:8080)
│ writes raw PCM
▼
call-NNNNNN.raw → call-NNNNNN.wav
One direction only. The caller speaks; the audio leaves FreeSWITCH and lands in a file. We are not yet sending audio back into the call. Bidirectional audio is the next post’s problem.
Step 1 — Install Node.js
Debian 12’s default Node package is too old. Install Node 20 from NodeSource:
sudo apt-get update

sudo apt-get install -y curl ca-certificates gnupg

curl -fsSL https://deb.nodesource.com/setup_20.x | sudo -E bash -

sudo apt-get install -y nodejs
Verify:
node --version
You should see something starting with v20.
Step 2 — Install the WebSocket server
Create a working directory:
sudo mkdir -p /opt/audio-fork-server

cd /opt/audio-fork-server

sudo npm init -y

sudo npm install ws
A note on permissions: throughout this post, we run the WebSocket server with sudo because it lives in /opt, a system directory, and writes its .raw and .wav files there as root. That’s fine for a development walkthrough, but it’s not what you’d do in production — in Part 5, we’ll switch the server to run under a dedicated service user with minimal permissions.
Create the server script:
sudo nano /opt/audio-fork-server/audio-fork-server.jsPaste this in:
// audio-fork-server.js

//

// Minimal WebSocket server for receiving streamed call audio from

// FreeSWITCH's mod_audio_stream. Writes received audio to a .wav

// file you can play back to confirm the plumbing works.

const fs = require('fs');

const path = require('path');

const { WebSocketServer } = require('ws');

const PORT            = 8080;

const SAMPLE_RATE     = 8000;   // Hz, must match the dialplan

const CHANNELS        = 1;       // mono

const BITS_PER_SAMPLE = 16;      // linear PCM

const wss = new WebSocketServer({ port: PORT });

console.log(`Listening for FreeSWITCH audio on ws://0.0.0.0:${PORT}`);

wss.on('connection', (ws, req) => {

  const filename = `call-${Date.now()}.raw`;

  const filepath = path.resolve(filename);

  const stream   = fs.createWriteStream(filepath);

  let bytesReceived = 0;

  console.log(`[${filename}] connection from ${req.socket.remoteAddress}`);

  ws.on('message', (data, isBinary) => {

    if (!isBinary) {

      console.log(`[${filename}] text frame: ${data.toString().slice(0, 200)}`);

      return;

    }

    stream.write(data);

    bytesReceived += data.length;

  });

  ws.on('close', () => {

    stream.end(() => {

      const wavPath = filepath.replace(/\.raw$/, '.wav');

      writeWav(filepath, wavPath, SAMPLE_RATE, CHANNELS, BITS_PER_SAMPLE);

      const seconds = bytesReceived / (SAMPLE_RATE * CHANNELS * (BITS_PER_SAMPLE / 8));

      console.log(`[${filename}] closed: ${bytesReceived} bytes (${seconds.toFixed(1)}s) → ${wavPath}`);

    });

  });

  ws.on('error', (err) => console.error(`[${filename}] error:`, err.message));

});

function writeWav(rawPath, wavPath, rate, channels, bits) {

  const pcm        = fs.readFileSync(rawPath);

  const byteRate   = rate * channels * (bits / 8);

  const blockAlign = channels * (bits / 8);

  const header     = Buffer.alloc(44);

  header.write('RIFF', 0);

  header.writeUInt32LE(36 + pcm.length, 4);

  header.write('WAVE', 8);

  header.write('fmt ', 12);

  header.writeUInt32LE(16, 16);

  header.writeUInt16LE(1, 20);

  header.writeUInt16LE(channels, 22);

  header.writeUInt32LE(rate, 24);

  header.writeUInt32LE(byteRate, 28);

  header.writeUInt16LE(blockAlign, 32);

  header.writeUInt16LE(bits, 34);

  header.write('data', 36);

  header.writeUInt32LE(pcm.length, 40);

  fs.writeFileSync(wavPath, Buffer.concat([header, pcm]));

}
The script does three things: accepts WebSocket connections, writes incoming audio to a .raw file, and wraps that file in a WAV header on disconnect so you can play it back. About 60 lines of actual code, one dependency.
Two things worth knowing about it. The script logs any text frames from mod_audio_stream (some configurations send a metadata header on connection) but doesn’t write them to the audio file. Every binary frame is raw PCM and gets written. The WAV header is written at the end, not the beginning, because the header includes the file’s total size and we don’t know that until the call hangs up.
Don’t start the server yet. We’ll start it in Step 8.
Step 3 — Install mod_audio_stream
mod_audio_stream ships as a prebuilt .deb for Debian 12. The following one-liner finds the latest release on GitHub and downloads it:
cd /tmp

curl -fsSL https://api.github.com/repos/amigniter/mod_audio_stream/releases/latest \

  | grep "browser_download_url.*deb" \

  | head -1 \

  | cut -d'"' -f4 \

  | xargs wget
Then install the dependencies and the package:
sudo apt-get install -y libssl-dev zlib1g-dev libevent-dev libspeexdsp-dev

sudo apt install -y ./mod-audio-stream_*.deb
The apt install ./<file> form (with the ./ prefix) tells apt to install a local .deb and also pull in any missing dependencies automatically.
Verify the module landed:
ls -la /usr/lib/freeswitch/mod/mod_audio_stream.soYou should see the file. If you don’t, the install failed silently — check the apt output for errors.
Step 4 — Load mod_audio_stream and verify
Add the load directive to FreeSWITCH’s autoload config so it loads at boot:
sudo sed -i '/<\/modules>/i \    <load module="mod_audio_stream"/>' \

  /etc/freeswitch/autoload_configs/modules.conf.xml
Verify:
grep audio_stream /etc/freeswitch/autoload_configs/modules.conf.xmlYou should see <load module=”mod_audio_stream”/>.
Now load it live without restarting:
sudo fs_cli -x "load mod_audio_stream"

sudo fs_cli -x "module_exists mod_audio_stream"
The second command must return true. If it returns false, the module loaded with errors — check journalctl -u freeswitch -n 50 | grep -i stream.
While we’re here, confirm the API command is registered:
sudo fs_cli -x "show api" | grep -i audio_streamYou should see uuid_audio_stream in the output, with a usage string showing the arguments it accepts.
Important detail you’ll need in Step 6: notice that show applications | grep audio_stream returns nothing. mod_audio_stream registers an API command, not a dialplan application. You cannot call it directly with <action application=”audio_stream” …/>. We’ll work around this in Step 6.
Step 5 — Install mod_lua
The dialplan needs Lua to invoke the uuid_audio_stream API command in a way that lets the resulting media bug live for the full duration of the call. (We’ll explain why in Step 6.)
sudo apt-get install -y freeswitch-mod-lua

sudo fs_cli -x "load mod_lua"

sudo fs_cli -x "module_exists mod_lua"
Should return true.
If module_exists mod_lua returns true immediately after apt-get install, the package was already there from your binary install — that’s fine, the load command was a no-op.
Step 6 — Create the Lua scripts
This is the step where most tutorials get it wrong, so it’s worth understanding why we use Lua here.
The intuitive thing is to call the API command from the dialplan with ${api(…)} substitution:
<action application="set" data="result=${api(uuid_audio_stream ${uuid} start ws://127.0.0.1:8080 mono 8000)}"/>This almost works. The WebSocket connection opens. Audio starts flowing. But the audio bug’s lifetime is tied to the synchronous ${api(…)} expansion, not to the channel. As soon as the expansion returns, the bug detaches, and the connection closes. You get about 0.3 seconds of audio in your file, then nothing.
Lua doesn’t have this problem. Calling the same API from a Lua script attaches the bug to the channel correctly, and it lives for the full call.
Find the FreeSWITCH script directory:
sudo fs_cli -x "global_getvar script_dir"On a binary install this is /usr/share/freeswitch/scripts. Substitute below if yours differs.
Create the start script:
sudo nano /usr/share/freeswitch/scripts/audio_stream_start.luaand paste in:
local uuid = session:get_uuid()

local result = freeswitch.API():executeString(

  "uuid_audio_stream " .. uuid .. " start ws://127.0.0.1:8080 mono 8000"

)

freeswitch.consoleLog("INFO", "audio_stream start: " .. tostring(result) .. "\n")
And the stop script:
sudo nano /usr/share/freeswitch/scripts/audio_stream_stop.luaand paste in:
local uuid = session:get_uuid()

local result = freeswitch.API():executeString("uuid_audio_stream " .. uuid .. " stop")

freeswitch.consoleLog("INFO", "audio_stream stop: " .. tostring(result) .. "\n")
Two lines of real logic each. Get the channel UUID, run the API command against it, log the result. The freeswitch.consoleLog call gives us visibility — if anything goes wrong, the message will appear in the FreeSWITCH log.
The argument format matters here. Note mono 8000, not mono 8k. The API command’s argument parser expects the literal numbers 8000 or 16000; 8k is silently rejected.
Step 7 — Create the dialplan extension
sudo nano /etc/freeswitch/dialplan/default/99_audio_stream_test.xml<include>
<extension name="audio_stream_test">
<condition field="destination_number" expression="^9999$">
<action application="answer"/>
<action application="sleep" data="500"/>
<action application="playback" data="tone_stream://%(500,0,800)"/>
<action application="set" data="STREAM_BUFFER_SIZE=20"/>
<action application="lua" data="audio_stream_start.lua"/>
<action application="playback" data="ivr/ivr-please_state_your_name_and_reason_for_calling.wav"/>
<action application="sleep" data="15000"/>
<action application="lua" data="audio_stream_stop.lua"/>
<action application="hangup"/>
</condition>
</extension>
</include>What this does, in order: answers the call, brief pause, plays an 800 Hz tone for half a second so the caller knows the call is live, sets the audio buffer size, starts the audio stream via Lua, plays a prompt, gives the caller 15 seconds to talk, stops the stream, hangs up.
The STREAM_BUFFER_SIZE=20 line sets how many 20ms audio frames mod_audio_stream accumulates before flushing them over the WebSocket. 20 frames is a reasonable starting point — low enough to keep latency tight, high enough to avoid wasting throughput on tiny WebSocket frames. We’ll revisit this in Part 5 when we tune for production.
Reload the dialplan:
sudo fs_cli -x "reloadxml"Step 8 — Test the call
In one terminal, start the WebSocket server:
cd /opt/audio-fork-server
sudo node audio-fork-server.js
You should see:
Listening for FreeSWITCH audio on ws://0.0.0.0:8080
Leave it running. From your softphone registered as 1001, dial 9999.
In the WebSocket terminal, you’ll see something like:
[call-NNNNNNNN.raw] connection from ::ffff:127.0.0.1
…
[call-NNNNNNNN.raw] closed: NNNNNN bytes (XX.Xs) → /opt/audio-fork-server/call-NNNNNNNN.wav
Some configurations of mod_audio_stream also emit a text metadata frame on connection. If you see one logged as text frame:, that’s normal — the script logs it and ignores it for the audio file.
In your softphone you’ll hear: a tone, then the IVR prompt asking you to state your name and reason for calling, then 15 seconds of silence (during which you should speak), then the call hangs up.
Speak during the silence. The whole point is to capture your voice.
Step 9 — Listen to what you captured
The .wav file is on the FreeSWITCH box. Copy it to your local machine.
You should hear the IVR prompt at the start, followed by your voice for the rest of the recording. A 15-second test call produces a .wav of around 240 KB.
If you can hear yourself, Part 2 is done. The plumbing works.
What just happened
When you dialed 9999:
- Your softphone sent a SIP INVITE to FreeSWITCH on port 5060
- FreeSWITCH walked the dialplan, matched 9999, and ran the audio_stream_test extension
- The call was answered, codecs negotiated (commonly G.722, PCMU, or PCMA depending on your softphone), and the tone played
- The Lua script ran, calling the API command uuid_audio_stream <uuid> start ws://127.0.0.1:8080 mono 8000
- mod_audio_stream opened a WebSocket connection from FreeSWITCH to the Node.js server
- As you spoke, FreeSWITCH took the inbound RTP audio, downsampled it to 8 kHz mono linear PCM, and pushed it through the WebSocket as binary frames
- The Node.js server wrote each frame to a .raw file
- After 15 seconds, the second Lua script stopped the stream
- The WebSocket closed; the Node.js server wrapped the raw PCM in a WAV header and saved it as .wav
The audio you played back is the same audio that, in Part 3, will be streamed to Deepgram in real time. We’ve proved the bridge. Part 3 is about replacing “write to disk” with “forward to STT.”
Troubleshooting
If anything went wrong, you almost certainly hit one of these. The order matches what you’re most likely to hit first.
“module_exists mod_audio_stream returns false”
The module didn’t load. Check:
sudo journalctl -u freeswitch -n 100 | grep -iE "audio_stream|stream"Most common cause: a missing dependency. The package install should pull these in, but if it didn’t:
sudo apt-get install -y libssl-dev zlib1g-dev libevent-dev libspeexdsp-dev

sudo fs_cli -x "load mod_audio_stream"
“Invalid Application audio_stream”
Your dialplan calls <action application=”audio_stream” …> directly. mod_audio_stream doesn’t register a dialplan application — only an API command. Use the Lua approach from Step 6.
Call connects, you hear the tone, then the call drops immediately
Same root cause as above, or the dialplan is using ${api(…)} to call uuid_audio_stream. Switch to the Lua scripts.
Files exist but contain only ~5 KB of audio (less than half a second)
You’re using ${api(uuid_audio_stream …)} in the dialplan. The bug is detaching as soon as the synchronous expansion returns. Use the Lua approach.
Files exist but won’t play back correctly
Most common cause: sample rate mismatch. The dialplan must say mono 8000 (literal number, not 8k) and the Node server must have SAMPLE_RATE = 8000. If you change one, change both.
If the audio plays at chipmunk speed or chipmunk-slow, the Node server’s SAMPLE_RATE is wrong relative to what FreeSWITCH is sending.
If the audio plays as pure static, the format is wrong. The Node server expects raw 16-bit signed little-endian linear PCM, which is what mod_audio_stream sends by default. If you’ve modified anything about the encoding, change it back.
The Node server never receives a connection
Check that it’s actually listening:
sudo ss -tlnp | grep 8080You should see node bound to port 8080. If not, the server crashed or isn’t running.
“I see SIP scanners hammering my logs”
If your FreeSWITCH box has a public IP, you’ll see lines like:
[WARNING] sofia_reg.c: SIP auth challenge (INVITE) on sofia profile ‘internal’ for [<weird number>] from ip <random IP>
This is the entire internet trying to register or place calls through your box. It’s not a problem. If you followed the hardening guide, you turned on log-auth-failures, which is why you can see them at all. As long as your default passwords are rotated and fail2ban is running, the attackers bounce off your auth and never get a session.
If you want to see how many have been blocked:
sudo fail2ban-client status freeswitchWhat’s next
In Part 3, we replace “write to disk” with “stream to Deepgram.” The dialplan and the WebSocket server architecture stay the same — but instead of accumulating audio in a file, the Node server forwards it to Deepgram’s streaming API and logs transcripts as the caller speaks.
That’s where the system starts to be a voice agent.
Part 3 lands soon!
All code from this series is on GitHub: https://github.com/thevoiceguy/freeswitch-voice-ai-series
Be First to Comment